-
Shop
- Adidas
- Advanced Technologies
- Bathroom
- Best-Sellers
- Car Accessories
- Dating & Social Skills
- Digital Resources
- AI & Technology
- AI Skills
- Beauty
- Budgeting & Saving
- Car Buying & Ownership
- Cozy Feast Collection
- Electronics & Technology
- Emotional Intelligence
- Entrepreneurship & Business Growth
- Financial Education
- Financial Independence
- Financial Mindset & Psychology
- Goal Setting
- Home Styling & Organization
- Kitchen & Recipes
- Leadership
- Mindfulness
- Mindset
- Motivation
- Online Business
- Parenting & Child Development
- Personal Style & Fashion
- Pet Lifestyle & Wellness
- Positive Thinking
- Productivity
- Self Confidence
- Sleep Improvement
- Smart Life with AI
- Stress Management & Relaxation
- Travel Planning
- Wellness
- Yoga & Fitness
- Yoga & Mind-Body Practices
- Easter Products
- Education & Learning
- Family & Parenting
- Fashion
- Alexander McQueen
- Bags
- Bags & Wallets
- Balenciaga
- Belts
- Blazers
- Bottega Veneta
- Brunello Cucinelli
- Burberry
- Chanel
- Chloé
- Dior
- Dolce & Gabbana
- Dresses
- Etro
- Fendi
- Gucci
- Hats & Hair Accessories
- Jewelry
- Jil Sander
- Keychains
- Kiton
- Luggage
- Miu Miu
- Off-White
- Outerwear
- Prada
- Rick Owens
- Saint Laurent
- Shoes
- Socks & Tights
- The Row
- Tom Ford
- Valentino
- Valentino Garavani
- Versace
- Vivienne Westwood
- Watches
- Furniture
- Gadgets
- Health & Beauty
- Health & Wellness
- Home & Garden
- Home Electronics
- Kids & Babies
- Kitchen
- Lighting
- Patio, Lawn & Garden
- Personal Growth
- Pet Care
- Pet Supplies
- Pets
- Smart Home Living Guides
- Sport & Outdoors
- Stress Relief & Relaxation
- TikTok Growth & Monetization Mastery
- Travel
- Wealth
- Wealth Building
- Popular
- Best deals
30W Hot Melt Glue Gun Kit: 20 Sticks for Crafts & Fixes
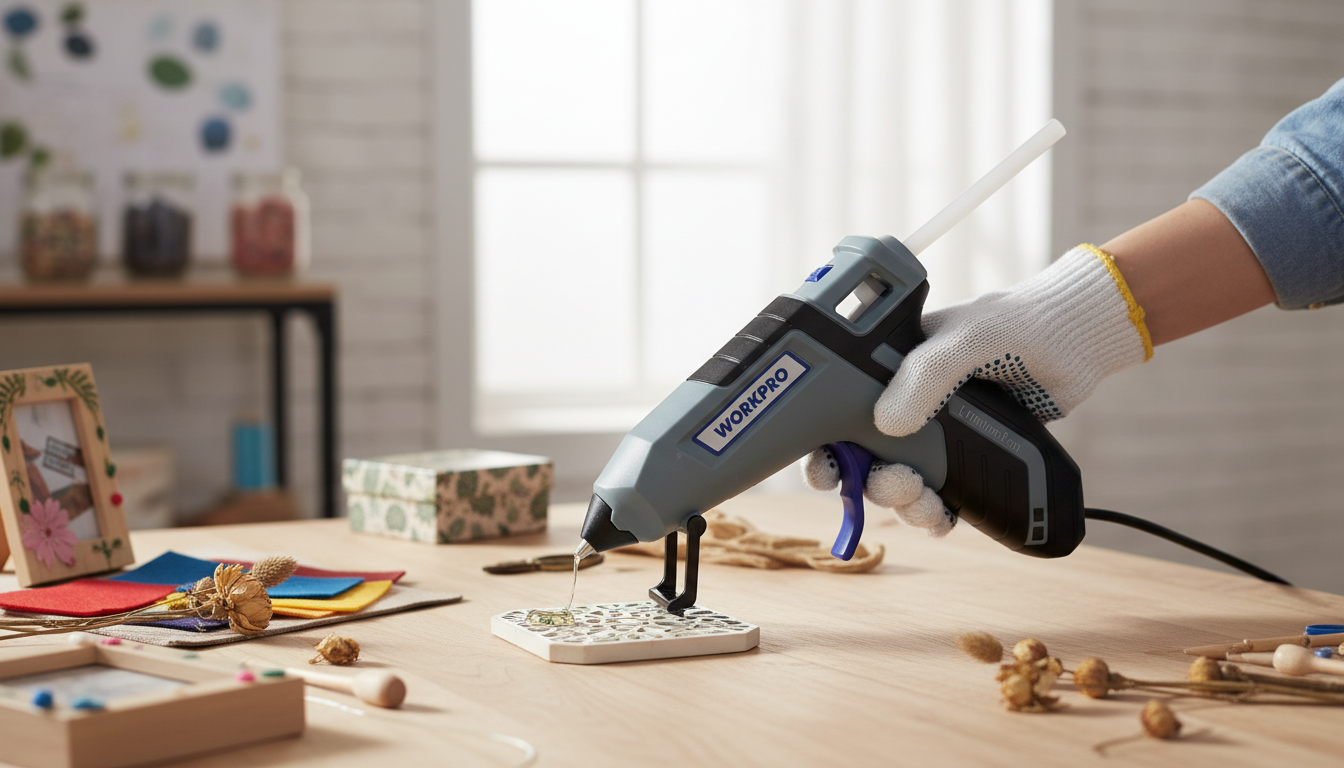
30W Hot Melt Glue Gun with 20 Glue Sticks for DIY Crafts & Quick Repairs
A compact hot melt glue gun is a go-to tool for fast bonding on common household materials, craft projects, and light-duty fixes. This 30W glue gun kit includes 20 glue sticks to get started right away, offering quick warm-up, controlled application, and a simple way to handle small repairs without clamps or long cure times.
What This Glue Gun Kit Includes
- 30W hot melt glue gun suited for crafts, décor, and quick household fixes
- 20 glue sticks for immediate use and refills for multiple small projects
- Best fit for light-to-medium bonding tasks where speed and convenience matter
- Ideal starter setup for craft rooms, classrooms, and home tool drawers
For many everyday projects, a 30W model hits a practical sweet spot: it warms quickly, lays down an even bead for most craft materials, and stays comfortable to use for short sessions like decorating, organizing, and quick touch-up repairs.
Where Hot Melt Glue Works Best
- DIY crafts: cardmaking, faux florals, wreaths, costume props, and holiday décor
- Home organization: securing cord clips, light trim pieces, and felt pads (non-load-bearing)
- Quick repairs: reattaching small plastic parts, loose trim, and minor toy fixes (as appropriate)
- Packaging and light assembly: temporary jigs, mockups, and quick tack bonds
Materials and typical results with hot melt glue
| Material | Typical bond result | Tips for better hold |
|---|---|---|
| Paper/cardboard | Strong | Press immediately and hold for a few seconds |
| Wood (unfinished) | Good | Apply to clean, dry surfaces; use a slightly thicker bead |
| Fabric/felt | Good to strong | Test on scraps; avoid saturating delicate fabrics |
| Plastic (smooth) | Varies | Lightly roughen with fine sandpaper and clean before gluing |
| Metal | Fair | Pre-warm the surface slightly (not hot) and keep the joint small |
| Glass/ceramic | Fair | Best for décor items; avoid heavy loads and temperature swings |
Key Features to Look For in a 30W Glue Gun
- Stable heating for smooth flow and fewer thick “strings” during application
- Comfortable grip and trigger control for consistent bead size and placement
- Nozzle design that supports precise lines for crafts and narrow joints
- Stand or resting position to reduce mess while the gun is hot
- A kit with extra sticks to avoid stopping mid-project
Small details make a big difference when working on tight corners, narrow seams, and decorative elements. A steady, predictable flow helps you place glue exactly where it needs to go—instead of chasing drips or re-melting clumps after the glue cools too fast.
Getting Cleaner, Stronger Bonds (Practical Technique)
- Prep surfaces: remove dust, oils, and loose paint; dry completely before gluing
- Dry-fit first: align parts before applying glue because hot melt sets quickly
- Use the right bead: thin for paper and small trims; thicker for gaps and porous materials
- Clamp by hand briefly: apply steady pressure until the glue sets, then let it cool fully
- Control stringing: pause slightly before lifting the nozzle and “twist off” the bead
One of the most useful habits is to treat hot melt like a fast-setting tack adhesive: position everything first, run the bead in one continuous motion, then press and hold. If you need more strength, build it in layers—let the first bead cool, then add a second bead along the seam for extra contact area.
Safety and Heat Handling
- Treat the nozzle and fresh glue as burn hazards; keep fingers clear of the bead
- Place the gun on a heat-safe surface and keep cords out of walkways
- Unplug when not actively in use; allow full cool-down before storing
- Use ventilation when working on mixed materials (paints, coatings, plastics)
- Keep away from children and pets unless directly supervised
Hot melt glue is quick, but it’s still a heat tool. For general burn-prevention basics, review guidance from the U.S. Consumer Product Safety Commission and workplace safety resources from NIOSH. A simple routine—stable rest position, clear workspace, and unplugging during breaks—prevents most mishaps.
Common Problems and Quick Fixes
- Glue won’t stick: clean surfaces; roughen smooth plastics; avoid dusty or oily areas
- Excessive dripping: don’t overfeed the trigger; rest the gun on its stand between beads
- Clogging: insert a fresh stick and allow it to warm; avoid forcing the trigger
- Messy strings: pull away slowly and twist; trim cooled strings with scissors
- Weak joints: increase contact area, add a second bead, or switch to epoxy for load-bearing repairs
Good Fits and Not-So-Good Fits
Product Option In Stock
- 30W Hot Melt Glue Gun with 20 Glue Sticks for DIY Crafts & Quick Repairs — a practical all-in-one choice for quick repairs and crafting sessions, bundled with 20 glue sticks for immediate use.
- How Essential Oils Can Ease Stress and Anxiety | Relaxation eBook Guide for Natural Stress Relief, Aromatherapy, and Anxiety Support — a low-key companion for winding down after long crafting or DIY sessions.
FAQ
How long should a glue gun warm up before use?
Most compact 30W glue guns typically need about 3 to 7 minutes to warm up. Start when the glue flows smoothly with steady trigger pressure, and test the first bead on scrap material before moving to your project.
Can hot melt glue be used on plastic and metal?
Yes, but results vary widely depending on the exact plastic, the smoothness of the surface, and temperature changes. For better hold, clean thoroughly and lightly roughen smooth plastics; for heavy-load or high-heat situations on plastic or metal, a stronger adhesive (like epoxy) is usually a better choice.
How can dripping and glue strings be reduced?
Use lighter trigger pressure, pause briefly before lifting the nozzle, and twist the tip away to “cut” the bead. Rest the gun properly between applications so heat stays consistent and extra glue doesn’t pool at the nozzle.
Recommended for you


Purple Line Art Extended Mouse Pad for Gaming & Work
Jul 17, 2026












Leave a comment