-
Shop
- Adidas
- Advanced Technologies
- Bathroom
- Best-Sellers
- Car Accessories
- Dating & Social Skills
- Digital Resources
- AI & Technology
- AI Skills
- Beauty
- Budgeting & Saving
- Car Buying & Ownership
- Cozy Feast Collection
- Electronics & Technology
- Emotional Intelligence
- Entrepreneurship & Business Growth
- Financial Education
- Financial Independence
- Financial Mindset & Psychology
- Goal Setting
- Home Styling & Organization
- Kitchen & Recipes
- Leadership
- Mindfulness
- Mindset
- Motivation
- Online Business
- Parenting & Child Development
- Personal Style & Fashion
- Pet Lifestyle & Wellness
- Positive Thinking
- Productivity
- Self Confidence
- Sleep Improvement
- Smart Life with AI
- Stress Management & Relaxation
- Travel Planning
- Wellness
- Yoga & Fitness
- Yoga & Mind-Body Practices
- Easter Products
- Education & Learning
- Family & Parenting
- Fashion
- Alexander McQueen
- Bags
- Bags & Wallets
- Balenciaga
- Belts
- Blazers
- Bottega Veneta
- Brunello Cucinelli
- Burberry
- Chanel
- Chloé
- Dior
- Dolce & Gabbana
- Dresses
- Etro
- Fendi
- Gucci
- Hats & Hair Accessories
- Jewelry
- Jil Sander
- Keychains
- Kiton
- Luggage
- Miu Miu
- Off-White
- Outerwear
- Prada
- Rick Owens
- Saint Laurent
- Shoes
- Socks & Tights
- The Row
- Tom Ford
- Valentino
- Valentino Garavani
- Versace
- Vivienne Westwood
- Watches
- Furniture
- Gadgets
- Health & Beauty
- Health & Wellness
- Home & Garden
- Home Electronics
- Kids & Babies
- Kitchen
- Lighting
- Patio, Lawn & Garden
- Personal Growth
- Pet Care
- Pet Supplies
- Pets
- Smart Home Living Guides
- Sport & Outdoors
- Stress Relief & Relaxation
- TikTok Growth & Monetization Mastery
- Travel
- Wealth
- Wealth Building
- Popular
- Best deals
Single-Horn Cast Steel Anvil: Round Horn, Stable Base
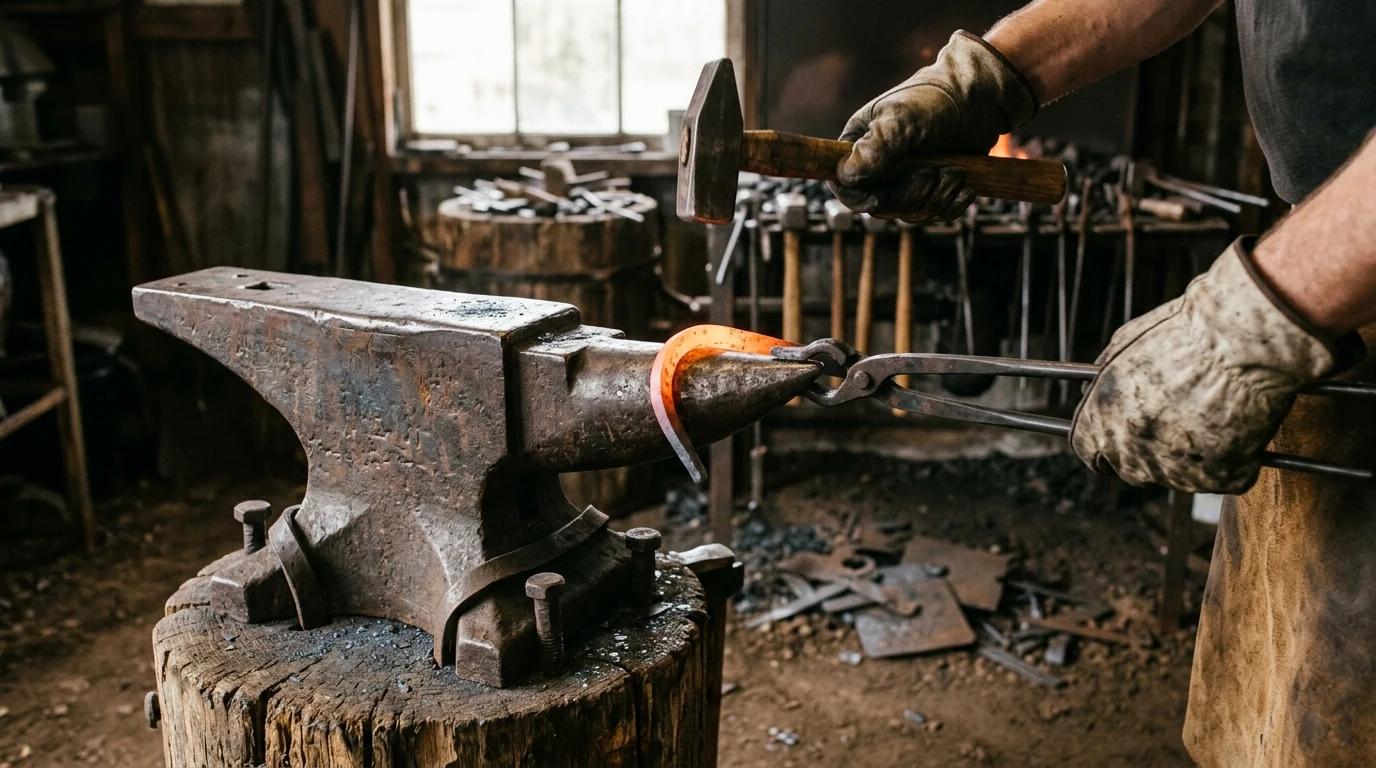
Single Horn Cast Steel Anvil with Round Horn and Stable Base for Metal Work
A dependable anvil is the center of many metalworking tasks, from flattening stock to shaping curves and cleaning up edges. This single-horn cast steel anvil pairs a rounded horn for smooth bends with a stable base designed to stay put during repeated hammering, making it a practical choice for hobby blacksmithing, light fabrication, and shop projects.
What This Anvil Helps With
A single-horn anvil is built for the most-used operations in a small forging or forming setup. The flat face gives you a predictable surface for hitting hot metal square, while the round horn opens up controlled bending without leaving sharp transition marks.
- General forging: flattening, drawing out, and basic shaping
- Curved work on the round horn: forming arcs, rings, hooks, and gentle tapers
- Edge cleanup and straightening: truing up bends and correcting twists
- Light shop forming: peening, fitting, and aligning metal parts on a hard surface
For background on how the anvil evolved into these core working areas (face, horn, base), see Britannica’s overview of the anvil.
Key Features to Look At
This style focuses on straightforward, repeatable work: a hard working face for hammering, a round horn for shaping curves, and a base footprint that can be mounted securely so your energy goes into the metal—not into chasing the anvil across the floor.
- Cast steel body: intended to provide a hard working surface for repeated strikes
- Single round horn: supports controlled bending without sharp transitions
- Stable base footprint: helps reduce walking and rocking during hammer blows
- Working face: the main flat area for planishing, flattening, and general hammering
- Compact footprint: easier to mount on a stump, stand, or bench setup for smaller shops
Feature-to-Task Guide
| Part/Feature | Best For | Practical Tip |
|---|---|---|
| Flat face | Flattening and planishing | Keep the face clean and free of scale to avoid imprinting marks. |
| Round horn | Bending and forming curves | Work gradually along the horn to control radius changes. |
| Base | Stability and vibration control | Mount firmly and add a rubber/wood layer under the stand to reduce ringing. |
| Edges | Shoulders, light edging, and fitting | Use smoother radiused edges for cleaner bends and fewer stress marks. |
Setting It Up for a Stable, Quiet Workstation
Mounting matters as much as the anvil itself. A stable, level setup improves accuracy, reduces fatigue, and helps keep noise under control. If you’re working in a garage or shared space, taming “ring” can be the difference between enjoyable sessions and a constant headache.
- Choose a solid mount: stump, heavy timber block, or a welded stand with a wide stance
- Set working height: knuckle-height is a common starting point for general forging
- Prevent movement: bolt or strap the anvil down; add a non-slip layer if needed
- Control ring and rebound: magnets, chain wrap, and a resilient mounting layer can reduce noise while maintaining performance
- Check level: a rocking anvil wastes energy and can affect accuracy
Noise can add up quickly in a metal shop. For practical guidance on reducing risk over time, consult NIOSH’s noise and hearing loss prevention resources.
Care, Safety, and Long-Term Use
A cast steel anvil is built to take repeated strikes, but the face and edges still deserve basic care. Good habits prevent mushroomed tools, chipped corners, and surface damage that can transfer unwanted marks onto your workpieces.
- Avoid striking the face with hardened tools: use proper hot-cut hardy tools and softer intermediates when appropriate
- Keep the face dry: wipe down after use; apply a light oil film if stored in humid areas
- Use correct hammer technique: glancing blows can chip edges and reduce surface life
- Wear eye protection: scale, chips, and hot fragments can eject during forging
- Inspect periodically: check mounting bolts/straps, stand integrity, and face condition
Eye protection is non-negotiable when striking metal. A clear overview of selection and use is available through OSHA’s Eye and Face Protection eTool.
When This Style of Anvil Makes Sense
A single-horn anvil with a stable base is a practical “daily driver” for a wide range of projects—especially when space is limited and you want one tool that handles the fundamentals without overcomplicating the workstation.
Recommended In-Stock Picks
- Single Horn Cast Steel Anvil with Round Horn and Stable Base for Metal Work
- How Essential Oils Can Ease Stress and Anxiety | Relaxation eBook Guide for Natural Stress Relief, Aromatherapy, and Anxiety Support
Product Snapshot
At-a-Glance Details
| Detail | Value |
|---|---|
| Product | Single Horn Cast Steel Anvil with Round Horn and Stable Base for Metal Work |
| Price | 68.51 USD |
| Availability | In stock |
| Material | Cast steel |
| Horn | Single, round horn |
| Base | Stable footprint for mounting |
FAQ
What is the round horn used for on a single-horn anvil?
The round horn is used for bending and forming smooth curves like hooks, rings, and arcs. By moving your work along the horn, you can change the bend radius gradually and control the shape with lighter, progressive strikes.
How should an anvil be mounted so it doesn’t move during hammering?
Mount it on a solid stump or heavy stand, then bolt or strap it down so it can’t walk or rock. Level the base, and consider a non-slip layer plus a chain wrap or magnets if you want to reduce ringing.
How can the working face be protected from damage over time?
Avoid hitting the face with hardened tools, and use proper cutting tools or softer intermediates when needed. Keep the face clean and dry, oil it lightly for storage, and focus on square, controlled hammer blows to prevent edge chipping.















Leave a comment